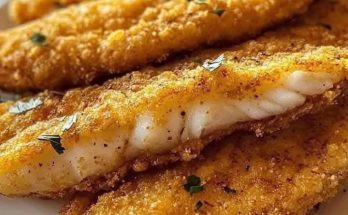
Are you in the mood for something crispy, cheesy, and irresistibly tasty? Look no further than Easy Fried Cheese Bites. These little golden morsels are the perfect snack or appetizer, offering a delightful combination of creamy mozzarella cheese encased in a crispy, seasoned coating. Whether you’re hosting a party or simply craving a comforting treat, these cheese bites are guaranteed to please your taste buds.
In this article, we’ll walk you through every step of making these crispy cheese delights, ensuring that you can recreate this recipe with ease. Let’s dive right into this cheesy goodness!
Ingredients for Easy Fried Cheese Bites
Before you begin, make sure you have all the ingredients handy. This recipe uses basic, easy-to-find ingredients that will transform into crispy, golden cheese bites in just a few simple steps. Here’s what you’ll need:
10 oz mozzarella string cheese (or 10 sticks)
1 cup Italian bread crumbs
1 cup flour
2 eggs
1/4 cup milk
Cayenne pepper (optional)
These ingredients come together to create a perfect balance of flavors, textures, and a bit of heat if you choose to add the cayenne pepper. Ready to start? Let’s get cooking!
Step-by-Step Directions to Make Easy Fried Cheese Bites
Now that you have your ingredients ready, it’s time to get down to business! The process is simple, but we’ll break it down step-by-step to ensure perfect results.
- Cut the Cheese
The first step is to cut the mozzarella cheese into bite-sized pieces. Take each mozzarella stick and slice it into 1-inch pieces. These small, uniform pieces will ensure that your cheese bites fry evenly and give you that perfect cheese pull when you bite into them. - Set Up the Breading Station
To make the breading process easier and faster, set up a breading station. You’ll need three separate bowls to get everything organized:
In the first bowl, place the flour.
In the second bowl, whisk together the eggs and milk to create a smooth, batter-like mixture.
In the third bowl, pour the Italian bread crumbs. If you want a bit of extra heat in your cheese bites, add a pinch of cayenne pepper to the bread crumbs for a spicy kick.
Setting up your breading station in this way helps speed up the process and ensures that the cheese bites get coated evenly.
- Bread the Cheese Bites
Now, it’s time for the fun part: breading! Take each piece of mozzarella cheese and follow these steps:
Roll it in the flour: Coat each cheese stick piece in the flour, ensuring it’s fully covered. This helps the egg mixture stick better.
Dip it in the egg mixture: Once the cheese is coated in flour, dip it into the egg and milk mixture, making sure it’s fully submerged.
Coat it in the bread crumbs: Finally, roll the cheese bite in the bread crumbs, pressing gently to ensure the crumbs stick well. Repeat this process for all the cheese pieces.
Once you’ve breaded all the cheese sticks, you’re ready for the next step!
- Chill the Cheese Bites
It’s important to chill the breaded cheese bites before frying. This step helps them maintain their shape and prevents the cheese from melting too quickly in the hot oil. Arrange the breaded cheese pieces on a tray and place them in the freezer for at least 20-30 minutes.
This freezing step is crucial because it helps keep the cheese from leaking out while frying, resulting in that crispy exterior and gooey center that makes fried cheese bites so irresistible.
- Fry the Cheese Bites
Now that the cheese bites are chilled, it’s time to fry them! Heat oil in a large skillet or deep fryer over medium-high heat to 350°F (175°C). The oil should be hot enough to fry the cheese bites quickly and evenly.
Carefully drop the breaded cheese bites into the hot oil, making sure not to overcrowd the pan. Fry the cheese bites for 1-2 minutes or until they are golden brown and crispy on the outside.
Since these cheese bites fry quickly, it’s best to work in batches to avoid overcrowding the oil. Frying them in small batches ensures that each piece gets the perfect crispy exterior without the oil temperature dropping too much.
- Drain and Serve
Once the cheese bites are golden and crispy, remove them from the oil using a slotted spoon. Place them on a paper towel-lined plate to drain excess oil. This step ensures that your cheese bites stay crispy and not greasy.
Serve your Easy Fried Cheese Bites immediately with your favorite dipping sauce, such as marinara sauce, ranch dressing, or even sweet chili sauce for an added flavor twist.
Easy Fried Cheese Bites – Crispy, Cheesy Perfection in Minutes!
Nutritional Information for Easy Fried Cheese Bites
You might be wondering how many calories these tasty little bites pack. Here’s the nutritional breakdown for this recipe:
Calories: 180 kcal per serving
Servings: 4 servings
These cheese bites are an indulgent treat, but they are perfect for sharing with friends and family. They’re light enough to enjoy as a snack but hearty enough to serve as an appetizer at a party.
Tips and Tricks for the Best Fried Cheese Bites
To ensure that your fried cheese bites turn out perfect every time, here are a few tips and tricks:
Use fresh mozzarella: For the best cheese pull, always use fresh mozzarella string cheese.
Chill the cheese bites longer: If you want extra crispy bites, chill the breaded cheese pieces for an hour or more before frying.
Don’t overcrowd the oil: Frying too many cheese bites at once will lower the oil temperature, resulting in soggy cheese bites. Fry in small batches for the best results.
Check the oil temperature: Use a thermometer to ensure that the oil is at the correct temperature. Too hot, and the cheese will burn; too cold, and the bites will absorb too much oil.
Common Mistakes to Avoid
While making fried cheese bites is easy, there are a few common mistakes you’ll want to avoid:
Not freezing the cheese bites: If you skip the freezing step, the cheese may melt too quickly in the hot oil, causing a messy disaster. Freezing helps keep the shape intact.
Not pressing the bread crumbs: When coating the cheese in bread crumbs, be sure to press gently to ensure the crumbs adhere properly. This will give you that crispy, crunchy exterior you want.
Overcooking the cheese bites: Keep a close eye on the frying process, as cheese bites cook very quickly. If you leave them in the oil for too long, they can burn or become overly greasy.
Frequently Asked Questions (FAQs)
Can I use other types of cheese?
Yes, you can use other cheeses like cheddar, provolone, or monterey jack. However, mozzarella works best because of its meltability and texture.
Can I make these in advance?
You can bread the cheese bites ahead of time and store them in the freezer until you’re ready to fry them. Just make sure to let them freeze for at least 20-30 minutes before cooking.
Can I bake the cheese bites instead of frying them?
While frying gives the best results in terms of texture and flavor, you can bake the cheese bites at 400°F (200°C) for about 10-12 minutes, flipping halfway through.
How do I make these spicier?
If you like a little heat, add cayenne pepper to the bread crumbs, or even use a spicier dipping sauce like sriracha ranch.
Can I freeze leftovers?
Yes, you can freeze any leftover cheese bites. Store them in an airtight container, and they should stay fresh for up to 3 months. To reheat, bake them at 350°F (175°C) for about 10 minutes.
Conclusion
These Easy Fried Cheese Bites are the ultimate comfort food, combining gooey mozzarella cheese with a crispy, seasoned coating. They are perfect as a snack, appetizer, or even a party food sensation. With the right ingredients, simple steps, and a few tips, you can make a batch of these cheesy bites in just 20 minutes. Serve them with your favorite dipping sauce, and you’re all set for a delicious treat!
If you’re craving more mouthwatering recipes, check out some of these fantastic ideas:
Maple Bacon Cheeseburger Bomb Quesadillas Recipe
Poor Man’s Husband Casserole – Budget Comfort Food Recipe
Cheesy Buffalo Chicken Pasta Bake – A Flavor-Packed Recipe
Enjoy these delicious bites with family and friends, and don’t forget to share your creative twists on the recipe!