At 87 years old, Dorothy Mitchell made an unconventional choice that stunned her family: she fired her home care nurse and hired a tattooed biker named Michael to help her with daily life.
Living alone in her apartment for decades, with advanced Parkinson’s disease and osteoporosis, Dorothy had grown tired of being treated like a checklist item by rotating caregivers. Michael, a kind and gentle man, had first helped her out of a difficult situation outside her building.
His daily visits quickly became a source of companionship, laughter, and care that Dorothy had not experienced in years. Unlike the nurses sent by agencies, Michael treated Dorothy like a person, not a patient. He remembered where she kept her crackers and tea, helped with medications, assisted her mobility, and engaged in real conversation.
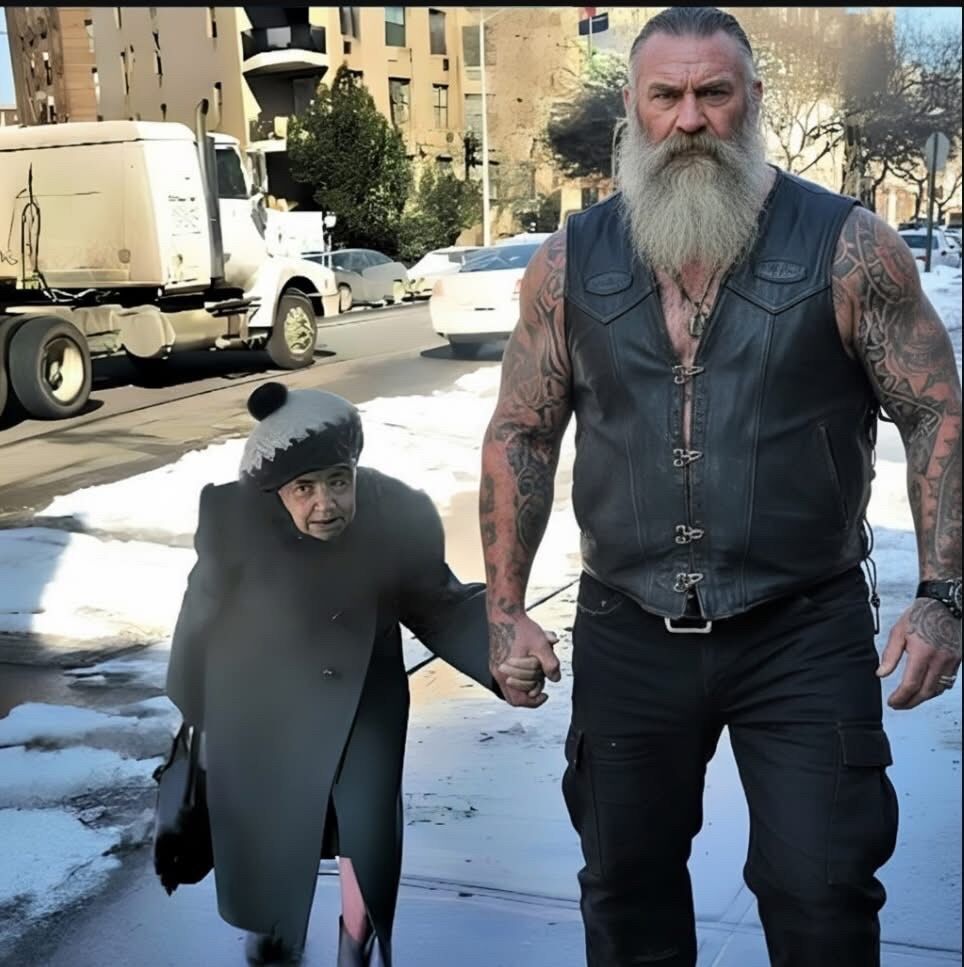
The 87-year-old woman fired her home care nurse and hired a tattooed biker instead, and her family threatened to have her declared incompetent. I’m her neighbor, and I watched the whole thing unfold from my apartment window across the hall. What her children didn’t know, what nobody knew except me, was why she did it. Her name is Dorothy Mitchell. Dorothy has lived in apartment 4B for forty-three years. Her husband died in 2003. Her three children live in different states and visit maybe twice a year. She has advanced Parkinson’s disease, osteoporosis, and the kind of loneliness that makes your bones ache. I moved in across from her two years ago. I’m a journalist, work from home, and I started noticing things. The home care agency sent different nurses every few weeks. Dorothy would try to talk to them, try to make friends, but they’d just do their job and leave. Feed her. Bathe her. Give her medications. Then disappear. She started leaving her door open during the day. Just a crack. Enough that she could hear someone in the hallway. Enough that she wasn’t completely alone. I’d wave when I passed. Sometimes I’d stop and chat. She told me about her late husband George, a Korean War vet. About her kids who were “too busy.” About how she used to travel the world and now couldn’t make it to the mailbox alone. The biker showed up on a Tuesday in January. I heard Dorothy’s door open and looked out my peephole. There he was. Maybe 6’4″, covered in tattoos, beard down to his chest, wearing a leather vest with patches. He was carrying grocery bags. My first thought was that Dorothy was being robbed. I opened my door. “Excuse me, can I help you?” He turned and smiled. The kind of smile that completely changed his face. “I’m just helping Miss Dorothy with her groceries. She called me.” Dorothy’s voice came from inside. “Michael, is that you? Come in, come in. And bring my nosy neighbor too.” I followed him inside, suspicious. Dorothy was sitting in her recliner, beaming. Actually beaming. I hadn’t seen her smile like that in months. “This is Michael,” she said proudly. “He’s my new helper. I fired the agency yesterday.” Michael set the groceries down and started unpacking them. He knew exactly where everything went. “Miss Dorothy likes her crackers on the second shelf,” he said. “And her tea bags in the canister by the stove.” I looked at Dorothy. “You fired the agency? Does your family know?” Her smile faded slightly. “My family doesn’t need to know everything I do. I’m not dead yet, despite their best efforts to plan my funeral.” Michael finished with the groceries and sat down on the couch. This huge, intimidating man sat down so gently, so carefully. “Miss Dorothy, you need to take your noon medications. Want me to get them?” “Please, dear.” He went to the kitchen. Came back with a pill organizer and a glass of water. Handed them to her with such gentleness. She took her pills and patted his hand. “Thank you, sweetheart.” I had to know. “How did you two meet?” Dorothy’s eyes sparkled. “He tried to steal my purse.” My jaw dropped. But that was nothing. Later I found out that biker was actually a serial…Read more below